服务端
docker-compose.yml
新建一个文件夹用于存放docker-compose.yml和conf文件夹
version: '3.1'
services:
  nps:
    image: ffdfgdfg/nps
    container_name: nps
    restart: always
    network_mode: "host"
    volumes:
      #映射conf文件夹
      - ./conf:/conf
      #映射证书文件夹(从宝塔的ssl文件夹中映射)
      - /www/server/panel/vhost/ssl/域名:/cert
conf文件夹
下载地址
其实就是仓库里的conf文件夹
下载好后解压,最后的文件目录结构应该如下:
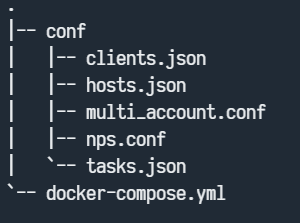
conf文件夹中多余的文件可以删去
nps.conf
打开nps.conf,根据自己的服务器进行修改
appname = nps
#Boot mode(dev|pro)
runmode = pro

#HTTP(S) proxy port, no startup if empty
http_proxy_ip=0.0.0.0
http_proxy_port={对外端口}
https_proxy_port={对外端口}
https_just_proxy=true
#default https certificate setting
https_default_cert_file=/cert/fullchain.pem
https_default_key_file=/cert/privkey.pem

##bridge
bridge_type=kcp
bridge_port={对外端口}
bridge_ip=0.0.0.0

# Public password, which clients can use to connect to the server
# After the connection, the server will be able to open relevant ports and parse related domain names according to its own configuration file.
public_vkey=guangjunmoment

#Traffic data persistence interval(minute)
#Ignorance means no persistence
flow_store_interval=1

# log level LevelEmergency->0  LevelAlert->1 LevelCritical->2 LevelError->3 LevelWarning->4 LevelNotice->5 LevelInformational->6 LevelDebug->7
log_level=6
log_path=/log/nps.log

#Whether to restrict IP access, true or false or ignore
#ip_limit=true

#p2p
p2p_ip={本机公网ip}
p2p_port={p2p端口}

#web
web_host=nps.momincong.com
web_username={管理员账号}
web_password={管理员密码}
web_port={web端口}
web_ip=0.0.0.0
web_base_url=
web_open_ssl=true
web_cert_file=/cert/fullchain.pem
web_key_file=/cert/privkey.pem
# if web under proxy use sub path. like http://host/nps need this.
#web_base_url=/nps

#Web API unauthenticated IP address(the len of auth_crypt_key must be 16)
#Remove comments if needed
#auth_key=test
auth_crypt_key={web后端token}

#allow_ports=9001-9009,10001,11000-12000

#Web management multi-user login
allow_user_login=true
allow_user_register=true
allow_user_change_username=false

...........以下省略..........
更改花括号部分为自己的配置
开放防火墙端口
UDP端口:p2p端口及往后数两个端口(例:p2p设置为1000,则需要开放1000-1002)、对外端口
TCP端口:对外端口
web端口用于反向代理,不需要开放(如果ip访问,需要开放tcp)
此外,之后如果配置内网穿透也需要开启对应的穿透端口
启动
配置好域名解析,反向代理后,启动容器
docker-compose up
登录后台成功后,将容器在后台启动
docker-compose down
docker-compose up -d
客户端
先在web界面注册用户,登录进入“客户端界面”,记下密钥

下载客户端,并和服务端一样,下载conf文件夹,去掉不需要的,最后目录树如下:
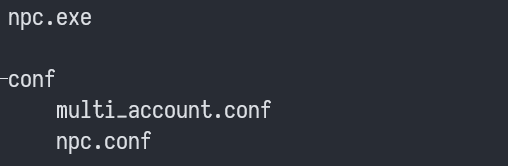
npc.conf
更改配置
[common]
server_addr={ip或域名}:{对外端口}
conn_type=kcp
vkey={记下的密钥}
auto_reconnection=true
crypt=false
compress=true
#pprof_addr=0.0.0.0:9999
disconnect_timeout=3
安装
先试运行,运行后刷新web界面,显示在线
.\npc.exe -config="{npc.conf的绝对路径}" -log_level=6 -log_path="{日志文件的绝对路径}"

然后安装成服务
.\npc.exe install -config="{npc.conf的绝对路径}" -log_level=6 -log_path="{日志文件的绝对路径}"
完成
